pxt-makerbit-maze
Creating an interactive maze game for the BBC micro:bit.
Yes, the micro:bit can be an interactive game! Do you like mazes? Imagine exploring a maze hidden inside a micro:bit. With a little bit of DIY hardware and some available, custom MakeCode blocks, you can!

The Concept of a micro:bit Maze
Here is the idea: use the LED panel of the micro:bit to show the “walls” as you move from one place to another in a virtual maze stored in the device’s memory. Navigate from one location to the next, until you find your way to the Exit. Hoorah! You win!
For example, a location in the maze might require you to go around a corner. Here is what it could look like on the micro:bit’s display:
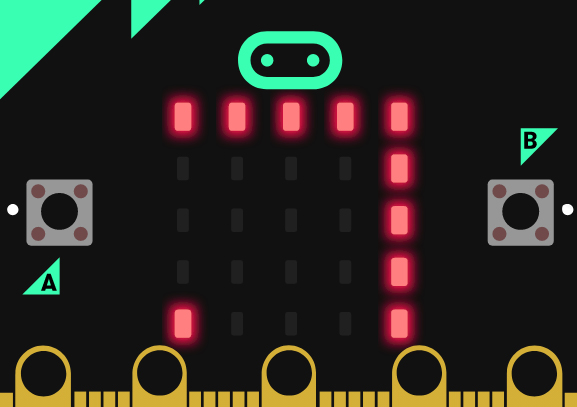
It’s obvious you could move to the left, or down, but not up or to the right. All you would need are some buttons to indicate the direction you want to go, and some code to tell the micro:bit what to do next. Oh, yes, and you would need some code to create the maze in the first place.
I wrote an extension package of custom blocks you can use in the MakeCode editor to create mazes and navigate within them. You can read more about that at the following URL: https://iowadave.github.io/pxt-maze.
This article aims to show how I built an actual game using the custom blocks, an old Amazon delivery box, and that wonderful micro:bit accessory called the MakerBit by Roger Wagner. That’s a picture of the game console, up at the top of the page.
Build a Game Console
A friend of mine served as Sea Bee in the U.S. Navy. He loves telling stories about a day when the admiral commanding his unit spoke to them.
“There are five ways to build anything!” the Admiral growled. “The right way. The wrong way. The Navy way. Your way. And MY WAY!” He went on, “Any questions how we’re going to build things in this outfit?”
Well, when it comes to building your game console for your maze game, I hope you will build it YOUR WAY. Because that is what the Maker movement is all about.
But let me show you how I put one together, in case it might give you some ideas. I’m using the LED panel of the micro:bit as the game’s display screen.
Gather the following materials:
- a micro:bit, version 1 or later
- a USB cable to connect with a computer
- a MakerBit by Roger Wagner
- an LED
- seven earring backs from the craft store, with the little clips that hold them in place
- jumper wires for the LED and the pins
- a small box (I re-used an Amazon delivery box.)
- a label to keep things organized. Feel free to download and print a copy of my PDF, if you wish. Use this link: https://raw.githubusercontent.com/IowaDave/pxt-makerbit-maze/main/images/Maze_Console.pdf
Here are some images showing selected examples of the components. You’ll need more jumper wires than they show. Re-check the quantities in that list, above.


Mount the MakerBit and the micro:bit
I cut a slot under one of the box flaps. The micro:bit can stick out through this slot. The MakerBit is secured inside the box with some painter’s tape.
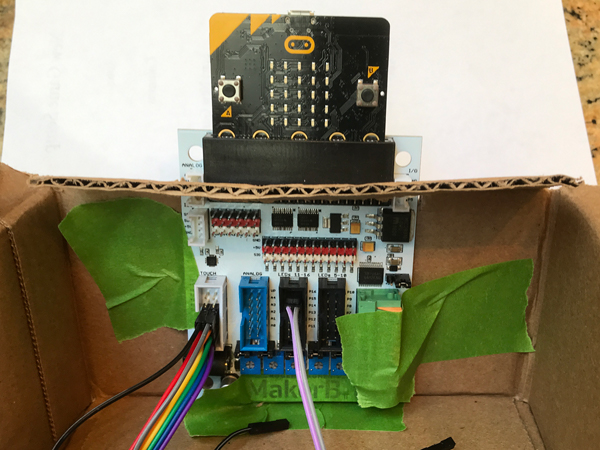
Label the box top, then flip it over and open the bottom.
I taped the box shut. A tidy label can make the game console look nice. I simply taped a printout of my PDF on top. You are welcome to use it. The link is up there in the components list.
After placing the label, I flipped the box over and opened the bottom to gain access to the inside. The following picture illustrates the next two steps. Study the picture a minute to get oriented.
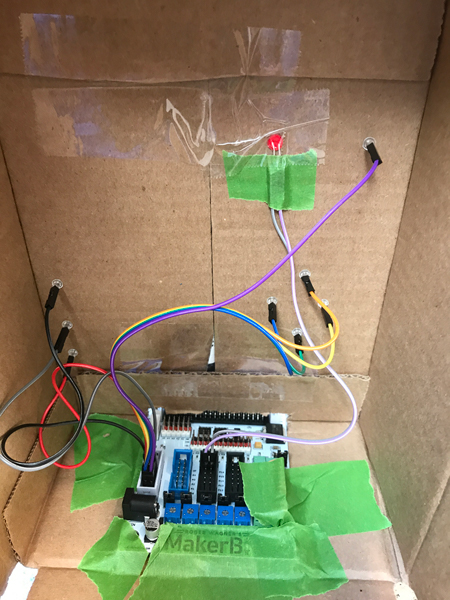
Install the pins and the LED
This was easy because my label had asterisks where I wanted the components to go. I poked small holes through the asterisks.
Push the LED – from the inside! – out through one of the asterisks labeled “Show Breadcrumbs”. Try to size the hole for the LED so it goes in without much difficulty but remains tight enough to help hold the bulb in place. I picked the spot directly underneath the word, “Show”. Bend the legs of the LED sideways and secure the component from underneath with tape.
Then push the earring backs through the remaining asterisks – from the outside! Secure those with the little clips. You want everything to be nice and solid where it goes through the box lid.
Connect jumper wires
Here’s where the MakerBit really shines and makes everything easy. It has special-purpose hardware that makes magic happen. For example, you can connect an LED directly without needing to place a resistor, as you would otherwise have to do if you were using a regular breadboard. Let’s do that part first.
Locate the black “header” that has pairs of pins inside. There are two of them, side by side. Focus on the one labeled P11 through P16. Find the pin-pair labeled P16. If you look at the MakerBit with the micro:bit at the top, then the notch in the black header will be on its left side. The pin on that side is the electrical “ground” pin. Run a jumper from it to the short leg of the LED. Run another jumper from the other pin to the long leg of the LED. That’s it, the LED is ready to work for you.
Now for some real magic. The gray header has 12 pins labeled T5 through T16. The “T” is for Touch. The magic is that if you connect one of those earring backs to one of those pins, the micro:bit can tell when you touch it! Roger Wagner, the designer of the MakerBit, likes to call them Touchpins, because that is how they work. As far as your code is concerned, they act like pushbuttons. But so much easier to hook up, because it takes only one wire to connect a touchpin.
Look closely at the gray header. Pin T5 is in the bottom-right corner. Start there, and run a jumper wire to the touchpin for Show Breadcrumbs. I ran jumpers to the other pins in this order:
- Left
- Up
- Right
- Down
- Rows
- Columns
- Start New Game
You can organize those connections any way you want to.
When we get to the code, you can see how to match up a touchpin with the action you want it to launch.
That’s it! You can close up the box now.
Supply power
The console is shown here using the USB cable to bring power from a computer. The MakerBit gives you another way to power your game. It has a round socket the right size for connecting a battery or a “wall wart” charger. 6 volts and 9 volts are typical kinds of batteries you can use. The game will run with only a battery, after you load the code into the micro:bit one time. The battery could be inside the box. It would be truly portable then. Play your maze game on the train. Earn the envy of your friends.

Grab the Essential Extensions
You can write the micro:bit code for your game using the popular MakeCode editor. There are two ways to do this: the really easy way and the slightly-less-easy way.
The really easy way is to simply load my code directly into the editor. Click the following link if you choose to replicate my version of a game console and try it out: https://makecode.microbit.org/#pub:_g1pgqya3fLvc.
The slightly less easy way is what you will want to do when you begin to write your own game. It’s still pretty easy. As in “1-2-3”.
- Start a new project in MakeCode
- Import the maze extension for Makecode.
- Click the Extensions icon (a little gear in the upper-right area of the editor window.)
- Choose “Extensions”
- Copy this URL into the search box: https://github.com/iowadave/pxt-maze
- Click the message that appears.
- Import the MakerBit extension for MakeCode. Basically repeat the steps above, but search for “MakerBit”. Click the message labeled plain “MakerBit” to get the version having all of its features.
If you followed the slightly-less-easy steps, you can easily import my game code in the next step.
Grab the code
Did you click the really easy link to open my code in the MakeCode editor? Great! You’ve got the whole thing. Just save it on your computer and enjoy.
Are you following the slightly-less-easy way? In that case, after you import the extension you still need to get my code. It is stored right here on github as a TypeScript code file. The simplest thing to do is to click open the file in your browser, copy everything, and paste it into MakeCode. Here are the steps.
- Open the code file in your browser. Click: https://raw.githubusercontent.com/IowaDave/pxt-makerbit-maze/main/makerbit-maze.ts
- Copy the text that appears.
- Go into the MakeCode editor and click on the JavaScript tab.
- Paste the text from github into the JavaScript tab.
- You can click back to Blocks if you want to. It’s optional.
Either way, you have got the code now. Download the project onto the micro:bit and start playing!
For Code Wizards Only
So, how do those touchpins cause things to happen in MakeCode?
The MakerBit has special hardware that detects an “event” when someone touches some metal that is connected to a pin in the gray header. Custom blocks in the MakerBit extension inform MakeCode about the event. For example, the following block triggers an action when the player touches a pin that connects to position number 10 in the gray header. Keep in mind that my version of the game console connects that pin to the touchpin labeled, Rows.
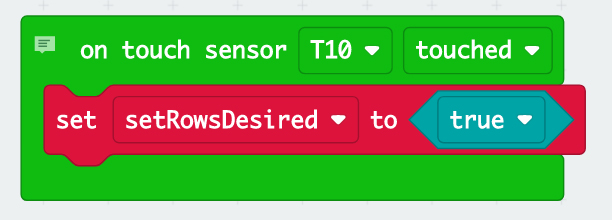
The Event block acts fast. All it does is to switch a true/false variable, named “setRowsDesired” to “true” from “false”. This is an example of using a variable as a “sentinel” or a “flag”. The change in the flag gets picked up and acted on in another block.
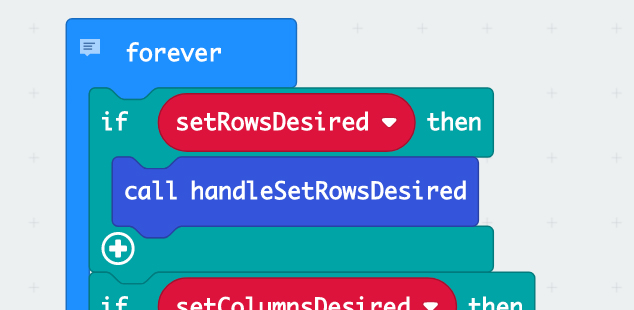
A series of if-then blocks in the “forever” part of my game code checks for changes in the true/false variables that the different touchpins manipulate. The block shown above is activated whenever the setRowsDesired variable is found to be true. The action is to call a function that handles the request.
All of the actions that are possible for a player to take in the game are triggered in the main forever loop by changes in various sentinel flags, brought on by the player touching a touchpin. It’s a crude example of so-called event-driven software design.
Explore!
Here is how to play. First, set the dimensions you want for your maze.
-
Choose the number of rows you want in your maze. Repeated pressing of the Rows pin on the game console will display and increment this number. It cycles through a range of 2 to the maximum supported number. At the time of writing, it allows up to 15 rows.
-
Choose the number of columns you want in your maze. This is done with the Columns button on the game console, like above. Again, the range is 2 to 15 at the time of writing.
2 x 2 is trivial, and is the default. 5 x 5 plays pretty fast. It gets a little more difficult with larger dimensions.
Optional maze features
You can enhance the level of challenge and interest by choosing some optional features of the game.
Feature Number One: Treasure
You can choose hide treaure in the maze! You can even give the treasure magical power to unlock the exit portal. Use the set maze treasure block:
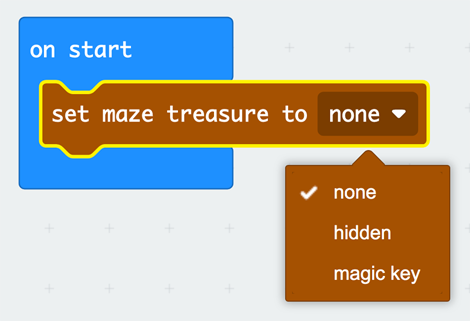
The treasure settings are:
- none = no treasure
- hidden = yes, hide a treasure, but leave the exit portal open
- magic key = yes, hide a treasure and also hide the exit portal. Reveal the exit portal only after finding the treasure.
The default treasure setting is “none”.
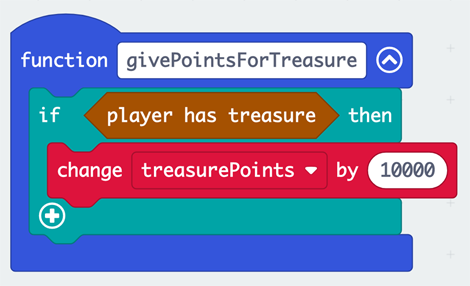
There is even a block called player has treasure that game developers can use to tell when a player has taken the treasure. The following illustrations shows how the block could be used to add 10,000 points to a player’s score for finding the treasure.
Feature Number Two: Random Portals
You can choose to place the entrance and exit portals at random locations, rather than at the corners of the maze. This makes the game more interesting and challenging because the direction to take toward the exit becomes less predictable. Use the place maze portals block:
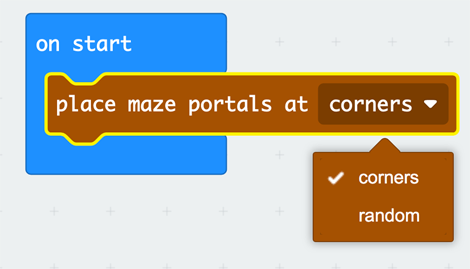
The portal settings are:
- corners = entrance at upper-left corner and exit at lower-right corner
- random = entrance and exit portals at random locations along the left- and right-hand sides of the maze, respectively
The default setting for the portals is “corners”
Start the game!
Touch the touchpin labeled Start New Game to, well… to start a new game. You will be placed just outside the upper-left corner of the maze. The entry cell is indicated by a double left-side wall. It looks like this:
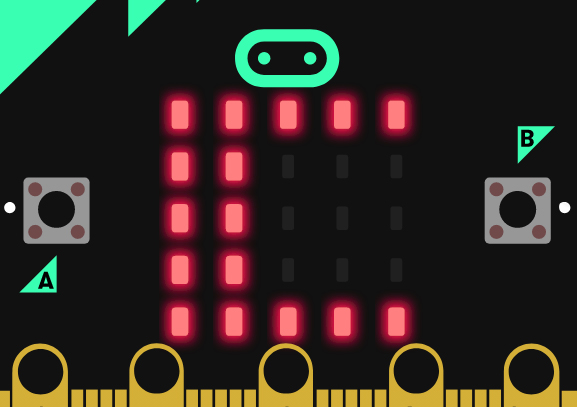
The LED display on the micro:bit shows the cell you are presently in. You can move in any direction that does not have a boundary line. Try moving towards one of the boundary lines to see what happens.
Use the directional touchpins to navigate. Your first move is to the right. Your goal is to emerge from the lower-right corner of the maze. The exit is indicated by a double right-side wall.
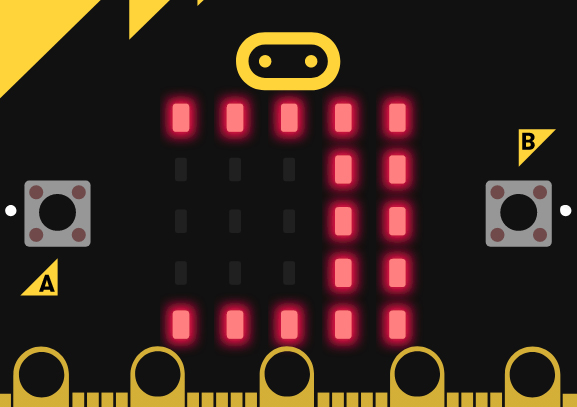
Woohoo! You won!
The treasure looks like a flashy diamond in the middle of a cell:
![]()
Players “take” the treasure by leaving the cell where they found it. If they return to that cell the treasure will not appear again, because the player has taken it!
The game automatically drops a breadcrumb when you leave a cell. During play, you may view the breadcrumbs. Press the touchpin under Show Breadcrumbs on the game console. The LED will illuminate to indicate that breadcrumbs are being shown, and you will see a dot in the center of the display when you enter a cell where you have been before. Like this:
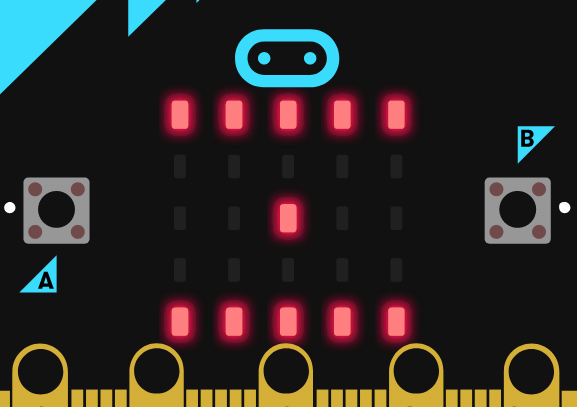
To stop seeing the breadcrumbs, touch the touchpin again. It is a toggle. Note that breadcrumb display can be activated only while navigating in the maze.
What else can you do with the maze extension blocks?
That’s a question only you can answer. Could you write MakeCode to use a joystick to move around in the maze? Could you make it a timed game, like a race against a clock? The MakerBit makes it easy to hook up an MP3 player and an LCD display. Or a NeoPixel device. How would you use things like that to make your game more fun to play? What idea of your own will you try first?