MakeCode Beyond The Blocks
Adding custom constant blocks to your project
by David Sparks
Original post: September 2019
This article will explain how to define a custom block to represent a constant value in MakeCode for the micro:bit.
For a quick summary of how to create custom blocks, see the introductory article in this series: The Top Ten Tricks For Creating Custom Blocks. You will find the author’s list of reference links related to custom blocks in there also. This article builds on that one by illustrating the procedures.
MakeCode provides an extensive set of user-friendly graphical blocks representing commonly-used code instructions from JavaScript.
MakeCode even provides a JavaScript window in which you can view and edit the JavaScript code that goes with the blocks. Click the “JavaScript” icon to switch windows.
Not all of JavaScript is available through the blocks, however. One missing piece is the ability to create a constant as a standard block, in the same way a variable can be created.
What is a constant? It is a name attached to a value, similar to a variable.
The difference is that the name of a constant remains attached to the same value for the life of your code. By contrast, the name of a variable can be reassigned to a different value.
Why would you want a constant? Three reasons.
The first reason is because it is good practice to use meaningful names for values in your code.
For example, we know from Math that the circumference of a circle is approximately equal to the diameter multiplied by the number 3.14159. It is good coding practice to give that number a short, memorable name, such as pi. Use the name rather than the number to perform calculations. It makes your code easier for a human to read and to understand.
The second reason involves accuracy and consistency: type once, use many times. Suppose your code needs to use precisely the same number in several places. A custom block for a detailed number like pi can help you avoid mis-typing a lengthy string of digits.
JavaScript supports constants; Blocks do not
The “official JavaScript” way to declare and use a constant is to use the keyword, const. For example, we use it to attach the name pi to the value 3.14159 in Exhibit 1.
If you copy and paste this code into the JavaScript window of MakeCode, it will actually compile and run on both the browser simulator and a real micro:bit. (Figure 1) A solution for the circumference of a circle having a diameter of 3 units, 9.42, will appear on the display.
Exhibit 1
Declare and use a constant
const pi = 3.14159;
let diameter = 3;
let circumference = pi * diameter;
basic.showNumber(circumference);
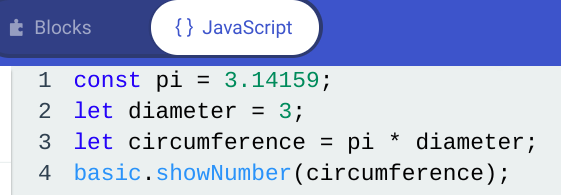
Figure 1
The JavaScript window with an example declaring a constant
Dear Experts: Yes, we know about Math.PI. It will be used later in the article. Please kindly remember this article is about user-defined constant blocks.
“What is the problem?” you might protest. “I just declared and used a constant with JavaScript in MakeCode!”
Here is the problem: MakeCode will revise your code when you switch over to the Blocks window. Try it.
Click the “Blocks” icon to view the code as blocks. (Figure 2)
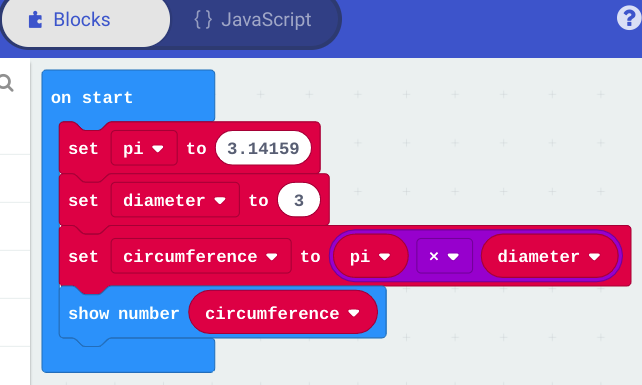
Figure 2
The JavaScript has been converted into blocks
Verify that the code still produces the correct result.
Click the “JavaScript” icon again. Look at your code now. (Figure 3)
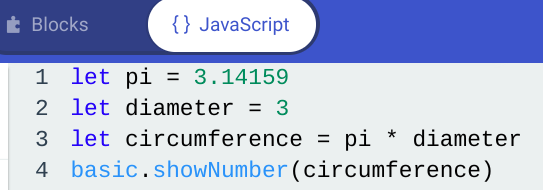
Figure 3
The blocks have been converted back into JavaScript
Your declaration was this: const pi = 3.14159. Makecode changed it to this: let pi = 3.14159.
By changing one word, const to let, MakeCode turned pi into a variable. We know this because let is a JavaScript keyword for declaring variables.
Now, it is certainly good practice to use meaningful names for both variables and constants. MakeCode will not flag an error if you use let rather than const as a way to attach the name pi to the number 3.14159. However, it creates a risk for errors elsewhere in your code.
The risk is that a variable’s name can be reassigned to a different value. Somewhere later in your code, when you are tired, distracted or in a hurry, you might enter something like the instructions shown in Figures 4 and 5.

Figure 4

Figure 5
Examples of reassigning a variable name to a new value
MakeCode (and JavaScript) will obey instructions to change the value attached to a variable name that was declared with the keyword, let — even if you did not intend to instruct for that particular change!
After its value changes, calculations performed using the name pi will be incorrect. Bugs like this can and do happen even to experienced programmers. They can be difficult to locate.
This brings us to the third reason why you might want to declare a constant.
JavaScript will not allow you to change the value attached to a name that was declared with the keyword const. The code examples in Figures 4 and 5 above would produce an error, alerting you to the problem before it can cause trouble.
To restate the problem: you cannot declare a const directly with blocks. If you do so in the main JavaScript window of MakeCode, it will be changed into a variable block.
Our solution: create a custom block that functions like a const. And here is happy news: the MakeCode editor is the only tool you need!
The official documentation for custom blocks, found at https://makecode.microbit.org/blocks/custom, states, “Any exported JavaScript function can be turned into a block by simply adding a //% block comment.”
It might not be immediately obvious how to do this in the MakeCode editor, however. The goal of this article is to show you.
PREVIEW
We will go into detail — with pictures — about the steps for adding a file named “custom.ts”. The editor converts the code you write in custom.ts into a new Custom group of MakeCode blocks. The steps for editing the custom.ts file in a new project are:
- Put the editor into scripting mode
- Click open the Explorer
- Click the “+” sign that appears
- Click “Go Ahead” in the dialog box that appears
- Write the JavaScript code for your block in the custom.ts file
Click the JavaScript icon to put MakeCode into scripting mode. In a new project it would look like Figure 6.
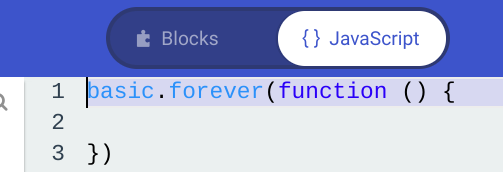
Figure 6
JavaScript mode
With JavaScript active, locate the link that says “Explorer >” (Figure 7)

Figure 7
The Explorer link
Click the Explorer link. A list of links to various code modules drops down. Keep your focus on the top item, the Explorer link. Notice that a plus sign, “+”, has been added to the Explorer link. (Figure 8) Click the plus sign.
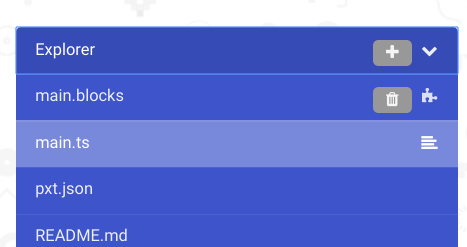
Figure 8
Partial list of the links under the Explorer
further
A window opens asking if you want to add custom blocks. Click “Go Ahead”. (Figure 9)
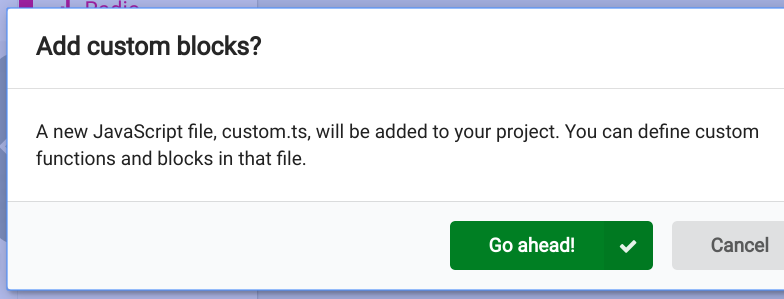
Figure 9
The custom blocks dialog window
A new module named custom.ts will appear and be highlighted in the Explorer list.
In future, after you have added custom.ts to your project, you may want to edit the file further. Navigate to it under the Explorer and click custom.ts to highlight it again.
The JavaScript window will fill in with the custom.ts code ready for editing. When you first add custom.ts to your project, it will contain code examples provided by default. (Figures 10 and 11)
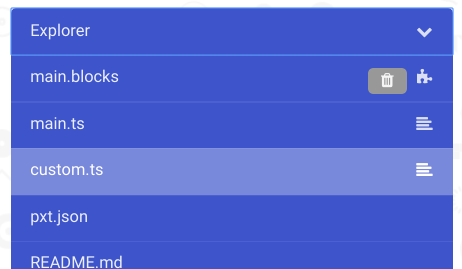
Figure 10
Explorer list containing the custom.ts item

Figure 11
The first few lines of custom.ts default content. Note the web address for official MakeCode documentation about writing custom blocks.</br>
You can delete most of the default code examples in the custom.ts module. However, be sure to keep the parts shown in Figure 12, including the curly bracket at the end. This code creates a namespace named “custom”. The namespace establishes the environment for creating custom blocks using the MakeCode editor.
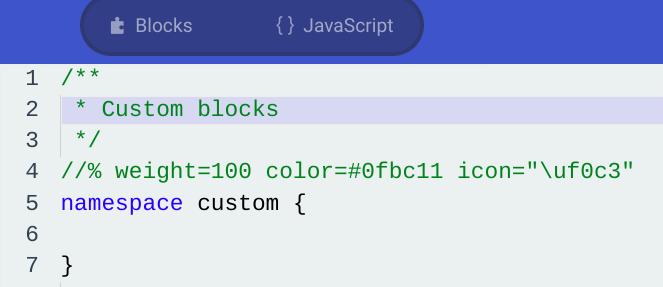
Figure 12
The custom namespace
Custom blocks are created by typing specially-formatted code in-between the curly brackets shown in Figure 12, above, as demonstrated in Exhibit 2, below.
Exhibit 2 lists a custom namespace containing one custom block, named pi, which provides a rather precise value for the mathematical constant of the same name. The syntax is important. The simplest thing might be to copy this code and paste it into the custom.ts window of your MakeCode project, replacing what was there.
Exhibit 2 custom.ts code for the custom constant block named pi
/**
 * Custom blocks
 */
//% weight=100 color=#0fbc11 icon="\uf0c3"
namespace custom {
    /**
     * returns a constant numeric value of 3.141592563589793
     */
    //% block="pi"
    export function pi(): number {
        return Math.PI;
    }
}
Your code should look like the screen image in Figure 13.
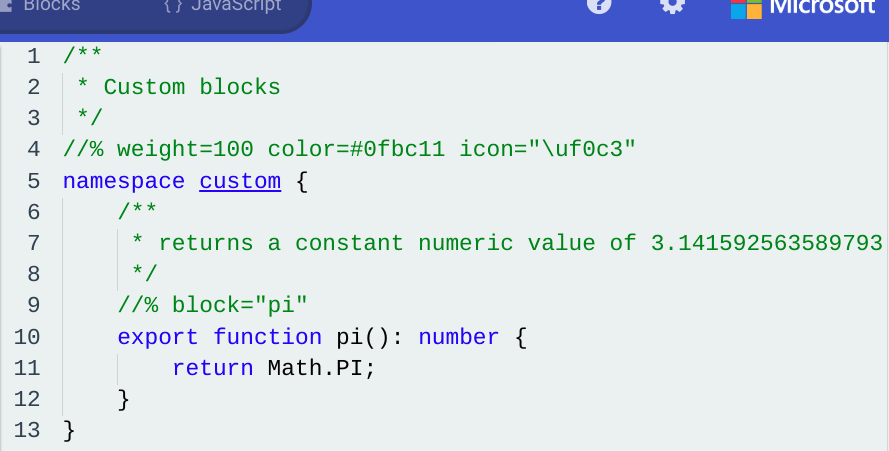
Figure 13
Custom code to create the pi block
Dear Experts: We used Math.PI in this example. We will discuss this special bit of JavaScript (and others like it) in more detail at the end of the article.
Compile your custom block code by clicking the Blocks icon. If all goes well, you will see a bright green Custom group added to the main blocks list. (Figure 14) If there are problems, stay in JavaScript and look for squiggly red underlines indicating potential trouble spots in your custom block code.
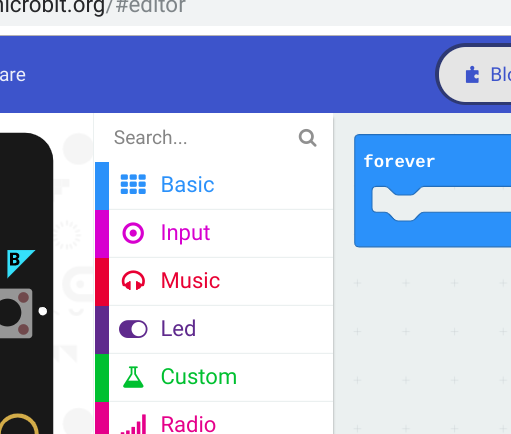
Figure 14
Blocks appear if code compiles correctly
Reload the browser window to make your new custom block available to MakeCode. For example, in the Chrome browser the reload icon looks like a circle with an arrow in it. (Figure 15)

Figure 15
The Chrome browser reload icon.
Click the Custom group to reveal the new block. (Figure 16)
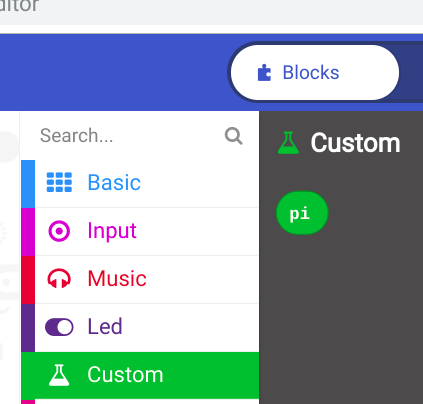
Figure 16
The pi block in the Custom group
Allow your mouse to linger on the new block. A “help” message will pop up. This is the comment line that you typed in your custom code. (Figure 17)
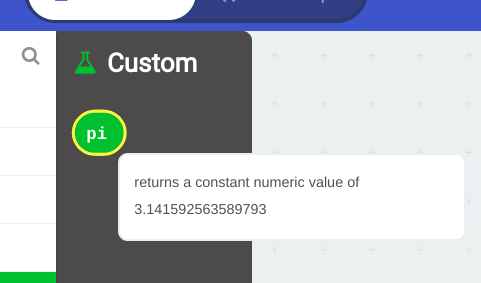
Figure 17
Helpful popup text from the comment in the custom block code
You can use the custom pi block anywhere you would use the number 3.141592653589793 or a numeric variable, with one exception.
MakeCode will not allow you to change its value with the blocks.
Of course, that protective effect is the whole idea of using a constant.
You can include more than one constant in your custom.ts file. And you can make constant blocks of other types, not only of numbers.
For example, Exhibit 3 lists code that extends the custom namespace by adding boolean constants to substitute for true and false when it might be more clear to say YES or NO. Again, just copy the code in Exhibit 2 and paste it into your custom.ts file, replacing what was there before. (Figures 18 and 19)
Exhibit 3
custom.ts code defining three custom constant blocks
/**
 * Custom blocks
 */
//% weight=100 color=#0fbc11 icon="\uf0c3"
namespace custom {
    /**
     * returns a constant numeric value of 3.141592563589793
     */
    //% block="pi"
    export function pi(): number {
        return Math.PI;
    }
    /**
     * return a constant boolean value of true
     */
    //% block="yes"
    export function yes(): boolean {
        return true;
    }
    /**
     * return a constant boolean value of false
     */
    //% block="no"
    export function no(): boolean {
        return false;
    }
}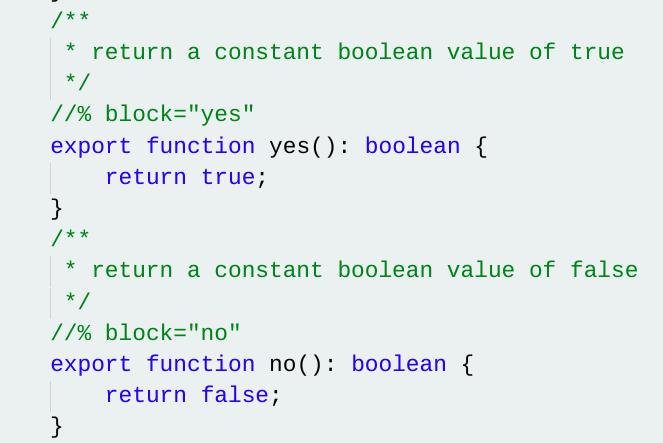
Figure 18
Custom blocks for yes and no constants
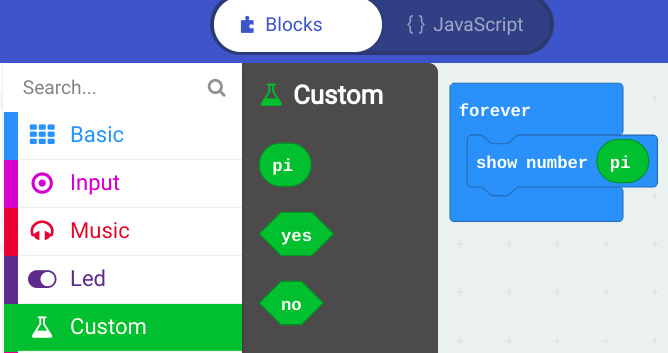
Figure 19
The yes and no blocks are diamond-shaped, like the true and false logic blocks
REVIEW
MakeCode blocks do not directly implement the const keyword from JavaScript. You cannot create a constant value directly in Blocks.
If you declare a const directly in the main JavaScript window, it will enjoy JavaScript’s protection as a constant for as long as you stay in JavaScript. However, MakeCode will change const to let when you switch to blocks, transforming your intended constant into a variable.
A custom block is one way to attach a value to a name that functions like a constant. Your code can use it like a variable yet the blocks cannot easily reassign the name to another value.
There might be other ways to achieve the same result. The approach we demonstrate in this article has appeal because it uses a method that MakeCode provides for the purpose.
You can load a MakeCode editor into your browser with code already typed in for the custom blocks described above. Click the following link to access the code.
https://makecode.microbit.org/#pub:_1wHWrFeLaF10
A MakeCode extension package accompanies this article. It contains these custom blocks plus all the other Math constants built into JavaScript. You can choose to load the extension package into your project, bypassing the need to create the custom blocks yourself. The steps to do this are:
- Click the gear icon in the upper-right area of the MakeCode editor
- Choose Extensions from the menu that drops down
- A text box will appear in the upper area of the MakeCode editor.
- Copy the following url and paste it into the text box: https://github.com/IowaDave/pxt-constants
- A text box will appear that is mostly empty, except for the title, “constants”, and a notice that user-provided extensions are not “endorsed” by Microsoft.
- Click the text box if you choose to go ahead and install the extension in your project.
By the way, you can view the code for the extension package before you decide whether to include it in your project. Paste the link given in step 4, above, into a new browser window, or simply click the link. It will connect you to the master repository for the extension package. The relevant code is in the file named “main.ts”. Click on the file name to view the code.
You can use the code in the extension package as examples for writing other custom constant blocks that you create in the custom.ts file of your project.
The syntax for custom blocks is important. Follow the examples in this article closely when creating your own custom constants. A little bit of trial and error can go a long way toward better understanding. Complete documentation about custom blocks begins at the following website:
https://makecode.microbit.org/blocks/custom
Dear Experts: True, JavaScript (to be completely correct, Static TypeScript) does in fact provide a special, built-in constant named PI in the Math module. It is the value that should be used in calculations because it carries pi out to the full precision available in MakeCode.
Alas, the Math group of blocks does not make it available by default. We propose a custom block to expose the constant in a useful way.
With a bit of tricky coding this built-in constant can be coaxed into appearing as a gray block. Afterward, the gray block can be re-used by copying and pasting.
This article focuses on how to create constant-valued custom blocks having any value the user chooses to assign. We selected pi as an example, and showed how to assign it the very precise value of Math.PI.
We leave it as an exercise for advanced readers to figure out how to utilize the built-in constant for pi as a gray block, if they wish.